I have seen a lot of spark issues on this site.
So, I sat down and started figuring out how to trouble shoot the whole works and make it easy to understand.
The following is what I have came up with so far.
I will be making changes as I am no where near done.
I am really sticking my neck out without finishing it and getting some good proof reading done.
I feel the first parts on the Stop switch, plug, and coil are fairly complete.
It's the rest I am still working on.
Any helpful suggestions are always appreciated.
Spark issues are among some of the most common problems we hear on KX500's.
The older they get, the more problems we hear about.
Fortunately, the KX500 is one of the easiest to trouble shoot.
What should you check first?
This question will get you a lot of answers.
I say, check the cheapest and simplest things first.
Do you have a shop manual for your dirt bike?
If not, get one.
A shop manual will not only have the specs for your electrical system, it will also take you step by step on simple repairs to complete rebuilds.
Working on your Electrical system can be dangerous if you don't take the proper precautions.
I caught a bike on fire once because the spark plug lit off some fuel that had spilled earlier in the day, so..... Be careful!!!
Drain the fuel if required, empty the carb, remove the tank, what ever it takes to make it safe.
First, here is a picture of the KX500 Electrical system:

As you can see, I included the wiring codes.
This system came off a 1994 KX500 but this system was virtually unchanged from 1990-2004 and some parts are used as far back as 1983

When checking electrical systems I always start with the simplest and cheapest things first.
So, the first thing I always check is the
Spark PlugSpark plugs can be a hot topic

I like to run NGK plugs.
The NGK manual has the following plugs for the following years:
1983-1984 KX500
REGULAR B9EG,
V-TYPE (GOLD) B9EGV,
IRIDIUM BR9EIX
1985-1997 KX500
REGULAR B8EG,
V-TYPE (GOLD) B8EGV,
IRIDIUM BR8EIX
1998-2004 KX500
REGULAR BR8EG,
V-TYPE (GOLD) N/A,
IRIDIUM BR8EIX WITH A SOLID TERMINAL NUT
The spark plug gap for the 1983-2004 KX500 is .024" and the retail price is about 6.50 USD as of 10-27-12.


When in doubt simply replace the plug.
Just be sure to properly set the gap.
No, it will not come out of the box ready to go and using your eye to measure the gap simply isn't good enough.
Get a feeler gauge and set it.
As shown above, when using the feeler gauge the gauge should slip in with some resistance.
It should not be loose and sloppy.
***Important Information******Important Information******Important Information***Many guys like to test their spark by removing the spark plug and kicking the bike over and watching to see if the spark plug sparks or not.
This method is fine.
However..... You must keep the ground electrode of the spark plug in contact with the engine at all times otherwise you can destroy your CDI and now you may have two problems to sort out and not just one.
Here is a picture of the ground electrode:

The next thing I check is the
Stop Switch sometimes called a
Kill Switch.
Here is the book info:
Fits 83-95 KX500 P/N 27010-1161 approx. retail price 34.00 USD as of 10-27-12.
Fits 96-04 KX500 P/N 27010-1350 approx. retail price 34.00 USD as of 10-27-12.
However, the switches for both year ranges work exactly the same way so you can mix and match if you need to.

You would be shocked how many times a 35 dollar switch kept a bike worth a few thousand from running.
You can test the switch with your ohm meter.
If you don't have one you can pick up a ohm meter from Radio Shack starting at about 25 dollars.
NOTE: Not all OHM meters have the same internal impedance values.
Just a quick note on impedance, impedance measures how easily a circuit conducts current when a voltage runs through it.
You measure impedance in ohms.
What this measurement tells you is how much of the voltage put into one end will make it to the other end.
The higher the resistance value is, the less voltage is making it through the circuit and usually meaning that something is getting hot :geek:
Your manual may or may not have those values recorded.
If the manual does not say what the impedance value should be they typically tell you what the part number for the correct OHM meter is.
Keep in mind that the impedance values will not make any difference for checking continuity, however, it will make a difference for checking resistance values.
Confused? Yeah, me too
Continuity is simply checking for any breaks in the wires.
Most OHM meters provide a Continuity setting.
In this picture I have my OHM meter set to check continuity.
Like a lot of other OHM meters my meter actually beeps when it is set to check continuity.
Some meters will light up or give you some indication that you have a good wire.
If you are not sure on your meter, set it to check continuity and touch the black and red leads together.
If it beeps or light's up then your good to go.
If nothing happens, read the manual that came with your meter.
You may have it set incorrectly or your battery may be bad.

To check continuity of the Engine Stop Switch, set the ohm meter to check continuity and hold one lead to one wire and one lead to the other wire.
Have a friend push the button or get creative
You can use some alligator clips to hold everything together for you.
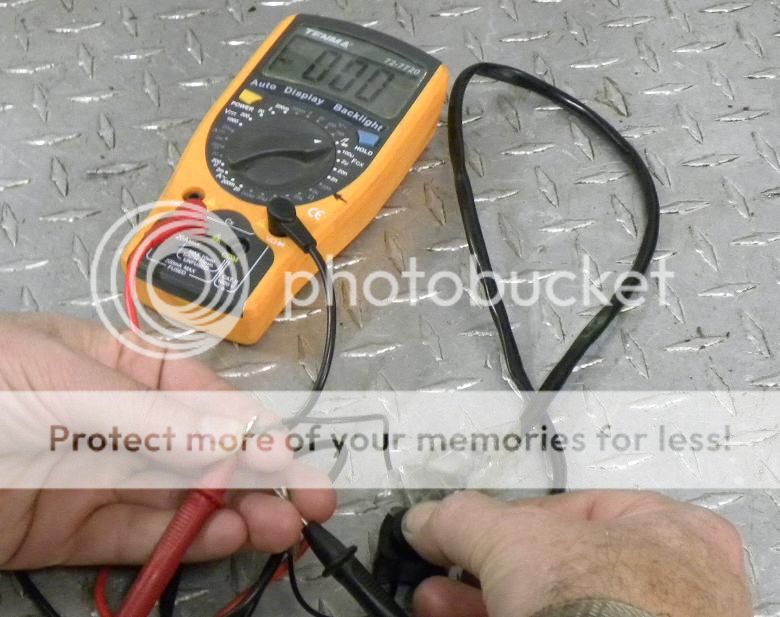
If your ohm meter beeps when you push the button down then the switch is good.
If nothing happens when you push the button down and you know that you meter is good, then it's time for a new switch or disassembly, cleaning and re-testing of the switch.
You do not want to ride any motorcycle without a good stop switch!
If you don't have a ohm meter you can disconnect the kill switch and kick the bike over.
Some caution is in order because with the the kill switch disconnected you will not be able to easily stop your engine if it starts and decides to rev up to 25,000 RPM

If the bike suddenly starts you can either quickly reconnect the kill switch or pull the spark plug wire off.
Once the kill switch is disconnected, kick the bike over again.
Still no spark?
The next thing I check is the Coil.
Your coil should be embossed with F6T536
It FITS 83-04 KX500 P/N 21121-1186 and the retail cost is about 75 USD as of 10-27-12.
Before you do anything, look for cracks in the plastic case, frayed, broken, or melted wires.
Whether or not everything appears good, follow the steps outlined below.

Did you just rebuild your bike?
Was everything working fine before you took it apart?
Did you paint your frame?
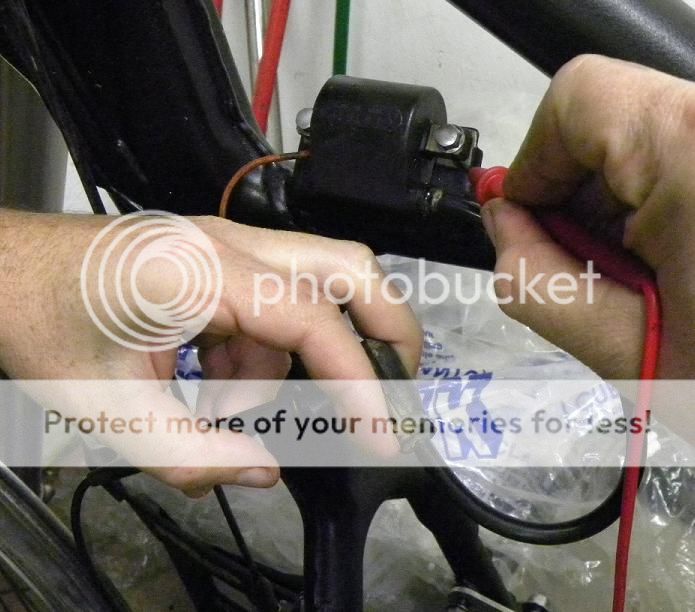
If you painted your frame, did you make sure that the Coil mounting area is bare of paint?
If you painted over the mounting area, your coil is not grounding.
Take a look at the picture below.
The frame is bare of paint allowing the Coil to make good contact with the frame and thus being correctly grounded.

If your coil is properly grounded then your next step is to check the OHM readings with your OHM meter.
If you don't have an OHM meter, you will need one for all of the next processes.
A quick note on Electrical testing of resistance with OHMS.
If a part tests slightly out of spec, consider looking for other problems before going down to the Kawasaki dealer and ordering parts.
Generally speaking Electrical parts can't be returned.
Once you buy them, you own them.
There are many factors that can cause a part to test out of spec.
We talked about the internal resistance of the meter.
However, temperature and how the part was used can also affect your readings.
You should check resistance with the ambient temperature at approximately 70 degrees.
Of course your personal abilities can also play a role in your readings.
Before ordering a part, check all the other components first.
Then, if you think you have narrowed down the problem, take the part to your local Kawasaki dealer and have them test it BEFORE you buy anything.
Most dealers will test the parts without charge but it is always good to ask them first.
Below is a picture of the coil with the various parts labeled.

To test the coil, disconnect the primary wire and the spark plug wire (Secondary wire).
Set your OHM meter to test OHMS.
More expensive OHM meters will have an auto range feature that will automatically select the correct range for you.
My cheapo unit does not have auto range so I have to set it for the range desired.
In this case the reading for the Primary lead (Orange Wire) should be 0.26-0.36 ohms so I had to set my meter to 200.
Setting the meter to 200 means that it will test from 0-200 OHMS.
Hook up your OHM meter with one lead to the orange wire and the second wire to ground on the frame.

If your readings are a little different then 0.26-0.36 ohms don't worry about it yet.
I have 3 coils for a KX500 that all work perfectly and yet every one of them reads between .4 and .5 OHMS.
As long as it is close that is good enough for now.
If you get no reading at all, take your coil to your nearest Kawasaki dealer and have them test it.
Now we are going to test the secondary.
If you don't have the auto range feature, set your OHM meter to the range as required.
I had to set my OHM meter to 20K.
Take the OHM meter leads and touch one to the Secondary lead (Spark plug cap) and the other lead to ground on the frame.
The reading for the Secondary lead (Black spark plug Wire) should be 2.6K -3.6K ohms.
No reading at all?
Disconnect the Spark plug cap from the Secondary wire as shown below.
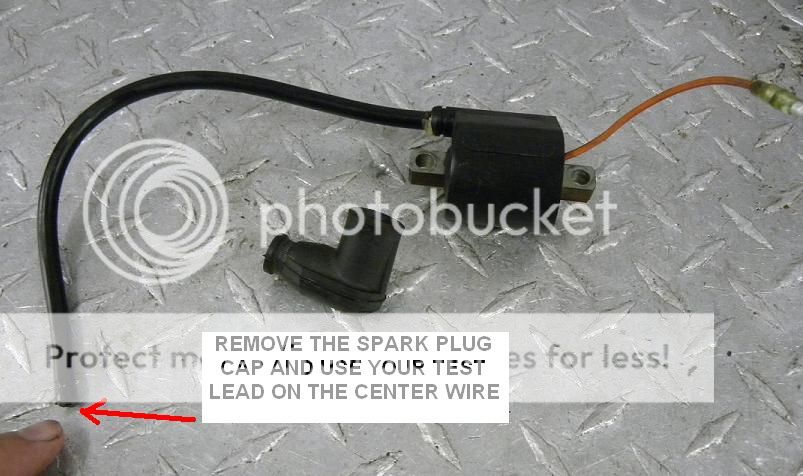
While leaving the coil bolted to the frame test again.
All 3 of my coils came up 3.0-3.1K so they are all good (Which I already knew
If you still get no reading, take your coil to your nearest Kawasaki dealer and have them test it.
As a final note on Coils, some people mistakenly believe that you can set your OHMS meter to do a continuity check for the primary and secondary wires. If it beeps that is good enough.
Not true.
Your OHM meter may or may not beep and the coil can still be good or bad.
Use the steps above as these are the most accurate way I know of testing.
More to comeStator
To check the stator, leave the stator attached to the bike so that it will be properly grounded.
Next, disconnect the Stator from the other wires.
Here is the OHMS specs for 89-04 KX500.
Black/White to Black/Yellow 153-230 Since I don't have an Auto Range finder I had to set my switch to 2K. My Stator read 290 but works fine.
White/Red to Black/Yellow 7.9-11.9 Since I don't have an Auto Range finder I had to set my switch to 200. My Stator read 11.0. Good!
If yours is a little out of spec, don't get upset yet.
Finish testing all the other components first....
Fly WheelF4T107 71 FITS 92-04 KX500 - 21007-1241 Retail price 324.00 USD as of 10-31-12
F4T102 71 FITS 89-91 KX500 - 21007-1183 Retail price 357.00 USD as of 10-31-12


To inspect the fly wheel you will need to remove it.
To see what all is involved in removing your Fly Wheel, I have an article on how to remove one from a RM250.
The process is exactly the same.
You can check it out here:
http://www.oem-cycle.com/forum/viewtopic.php?f=40&t=118There are two main area's of concern that I will cover.
1. If there are any dents in it, or anything looks suspicious... Replace it...
2. The key way must be in good condition.
Look at the picture below.
See that Key way?

Take the Wood-ruff key and put it into the Key way.
Here is a picture of the key:

If there is any side to side play you will need to determine where the problem lies.
It will either be the key or the Key way on the fly wheel.
If the key is sheared you'll probably figure that out as you are removing the fly wheel as it can make getting the fly wheel off very difficult.
If both appear to be good, check the key way on the Crank shaft.

Once again, take the key and put it into the key way on the crank shaft.
If it rocks side to side you will need to replace either the key, the crank, or both.
Another test of the flywheel, key and crank, is too loosely assemble the fly wheel on the crank with the key and try to spin it back and forth.
If it clunks, or wobbles around a bit, one of those 3 items or all may need to be replaced.
One last thing on these items to look for it how well the fly wheel fits on the crank shaft.
The taper of the rotor must be tight with the taper of the crank shaft.
Again, take the fly wheel and put it on the crank shaft with the nut torqued.
Try to move the fly wheel around while holding the crank still.
If it rattles, clunks, or moves at all then you better carefully inspect the taper of both the fly wheel and crank shaft to determine where the problem is at.
Another thing to look at is as you are spinning the crank around, see if the flywheel runs true.
If it wobbles around, even if it fits tight on the crank shaft, you will need to re-inspect to see where the problem is.
CDI or Capacitor Discharge Ignition.FITS 89-04 KX500 ?
P/N 21119-1267 -
19 deg BTDC @ 6000 RPM
Retail Cost as of 10-29-12 320.00 USD.

According to the Kawasaki Manual you can't test the CDI as it requires special equipment.
Here is a quote: "The I.C. Igniter can only be tested with special electrical equipment and improper testing may damage it. Refer all testing to a Kawasaki dealer".
Just for grins I took my OHM meter and tested every combination of wires and this is all I could come up with.
These numbers may or may not mean anything
White/Red (Red test lead) to Stator Black/White (Black test lead) measures 1.3 when the range is set to 200M.
White/Red (Red test lead) to Stop Switch Black/White (Black test lead) measures 1.3 when the range is set to 200M.
White/Red (Red test lead) to Stator Black/Yellow (Black test lead) measures 1.1 when the range is set to 200M.
Black/Yellow (Red test lead) to Stop switch Black/White (Black test lead) measures 1.1 when the range is set to 200M.
Black/Yellow (Red test lead) to Stator Black/White (Black test lead) measures 1.1 when the range is set to 200M.
Black (Red test lead) to Stop Switch Black/White (Black test lead) measures 1.3 when the range is set to 200M.
Black (Red test lead) to Stator Black/White (Black test lead) measures 1.3 when the range is set to 200M.
Stator Black/White to Kill Switch Black/White has continuity.
Those were the only readings I could get.
Most likely your local Kawasaki dealer won't be able to test the CDI for you but it's worth a shot.
Unfortunately, if everything else looks good your only option may be to simply replace it and see what happens
As a final note, a tech tip that people use on older bikes may apply here as well.
This is not in the book but it does make sense.
Running a ground wire from your stator backing plate to your coil will insure that the system is properly grounding.
Remember, your coil is grounding to the frame and your stator is grounding to your engine.
Sometimes over time the engine and the frame are no longer grounded to each other.
This same technique can apply to add on's such as Regulator/Rectifiers, lights and other accessories.
Do you have more tips that you would like to see added to this article?
Let me know and I'll be happy to add them.
Thanks!
SB